
How to Light Jewelry for Perfect Photos: The Complete Lighting Guide
Lighting is the single most important factor in jewelry photography. Even the most expensive camera cannot produce stunning jewelry photos if the lighting is poor. On the other hand, a simple smartphone paired with the right lighting setup can capture professional-quality images that showcase the beauty of rings, necklaces, bracelets, earrings, and gemstones.
Jewelry is one of the most challenging products to photograph because of its reflective surfaces, polished metals, and sparkling gemstones. Gold, silver, platinum, diamonds, and other precious stones reflect everything around them, making it easy to capture unwanted glare, harsh reflections, and distracting shadows.
Learning how to light jewelry correctly allows you to highlight every intricate detail while maintaining accurate colors and natural brilliance. Whether you're photographing jewelry for an online store, social media, or a product catalog, understanding lighting techniques will dramatically improve the quality of your images.
In this guide, you'll learn the best lighting setups, equipment recommendations, and professional techniques for creating flawless jewelry photos.
Why Lighting Is So Important in Jewelry Photography
Unlike many other products, jewelry depends almost entirely on light to reveal its beauty.
Proper lighting helps:
- Reveal intricate details
- Showcase gemstone brilliance
- Display accurate metal colors
- Reduce harsh reflections
- Create natural-looking shadows
- Improve image sharpness
- Increase perceived product value
Poor lighting can make expensive jewelry appear dull, lifeless, or poorly made, while good lighting enhances its craftsmanship and luxury appeal.
Understanding Light and Reflections
Jewelry behaves differently than most products because polished metals and gemstones reflect their surroundings.
Highly reflective surfaces can capture:
- The camera
- The photographer
- Windows
- Furniture
- Colored walls
- Light stands
- Ceiling lights
Instead of trying to eliminate every reflection, professional photographers learn how to control them.
The goal is to create clean, soft reflections that define the jewelry's shape without distracting the viewer.
Natural Light vs. Artificial Light
Both natural and artificial lighting can produce excellent jewelry photos, but each has its own advantages and limitations.
Natural Light
Natural light is an affordable option for beginners.
Advantages
- Free to use
- Soft when diffused
- Produces realistic colors
- Easy to access
Disadvantages
- Changes throughout the day
- Depends on weather conditions
- Difficult to maintain consistency
- Limited shooting hours
For best results, photograph jewelry near a large window using a white curtain or diffuser to soften direct sunlight.
Avoid shooting under harsh midday sunlight, as it creates strong reflections and deep shadows.
Artificial Light
Artificial lighting provides greater control and consistency.
Popular options include:
- LED panels
- Continuous studio lights
- Softboxes
- Ring lights
- Photography light tents
Advantages
- Consistent lighting
- Repeatable results
- Works day or night
- Better control over shadows
- Ideal for large product catalogs
Disadvantages
- Higher initial investment
- Requires proper positioning
Most professional jewelry photographers rely on continuous LED lighting combined with softboxes or light tents.
The Best Type of Light for Jewelry Photography
Soft, diffused light is the preferred choice for jewelry photography.
Unlike harsh direct lighting, diffused light spreads evenly across the jewelry, reducing reflections while preserving detail.
Common light modifiers include:
- Softboxes
- Diffusers
- White umbrellas
- Light tents
- Frosted acrylic panels
These tools soften the light source, creating a clean and professional appearance.
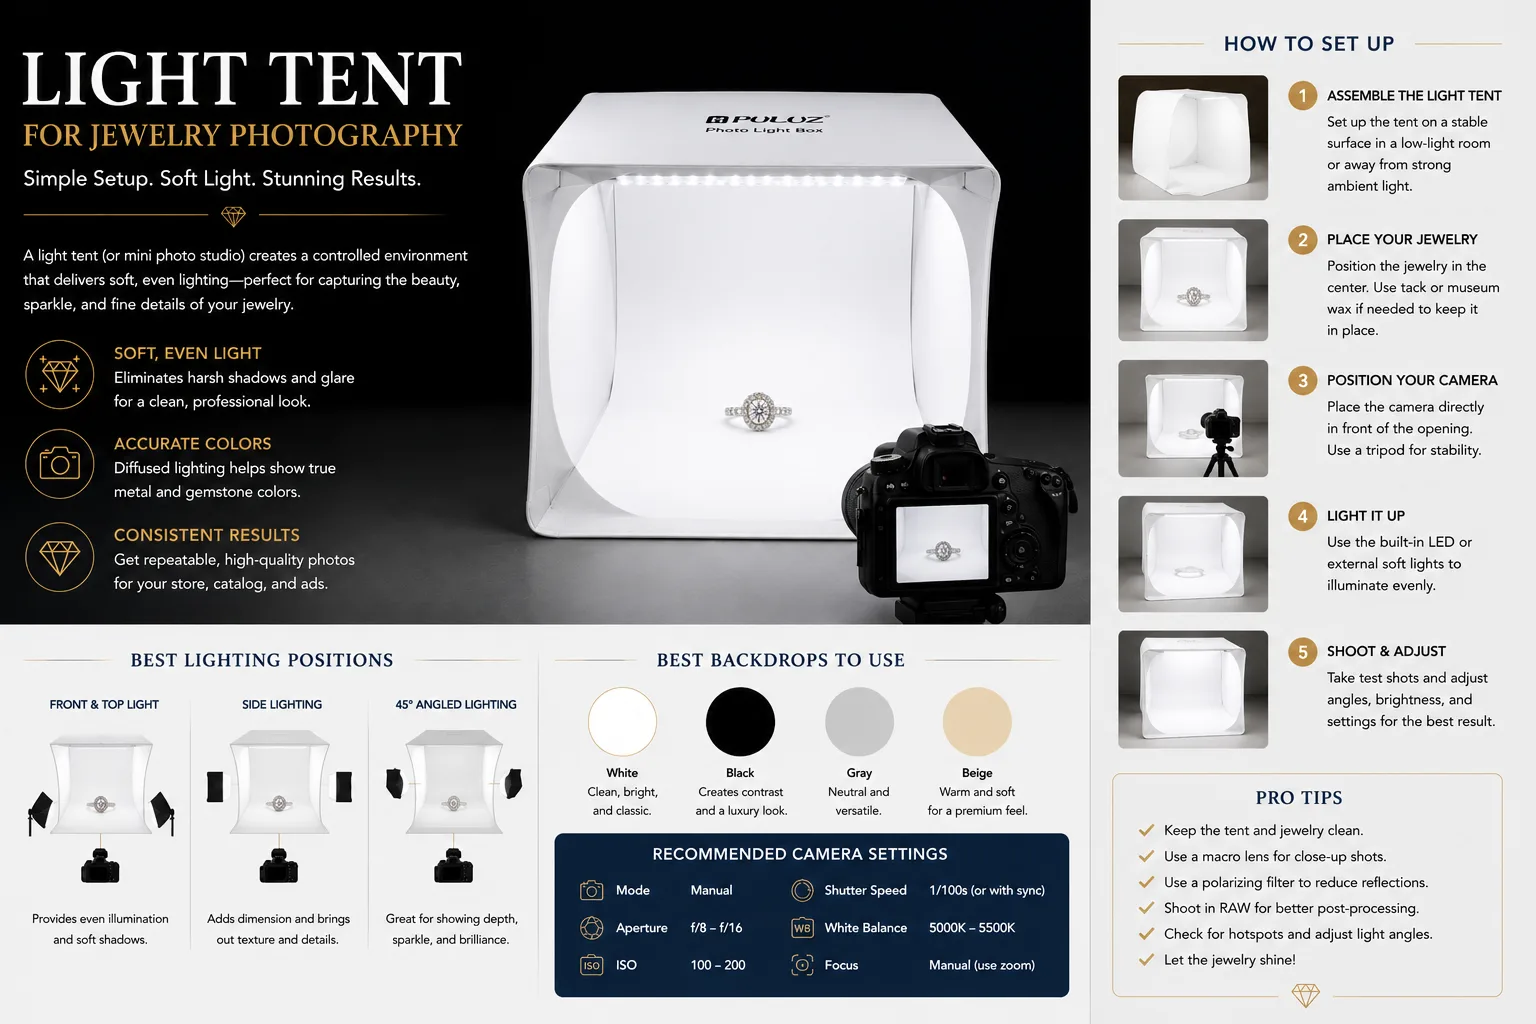
Using a Light Tent
A light tent, also called a light box, is one of the easiest ways to improve jewelry photography at home.
The translucent walls diffuse incoming light, minimizing harsh reflections and shadows.
Benefits include:
- Even illumination
- Cleaner reflections
- Better color consistency
- Reduced glare
- Professional-looking backgrounds
For beginners, a light tent is one of the best investments for achieving studio-quality results without expensive equipment.
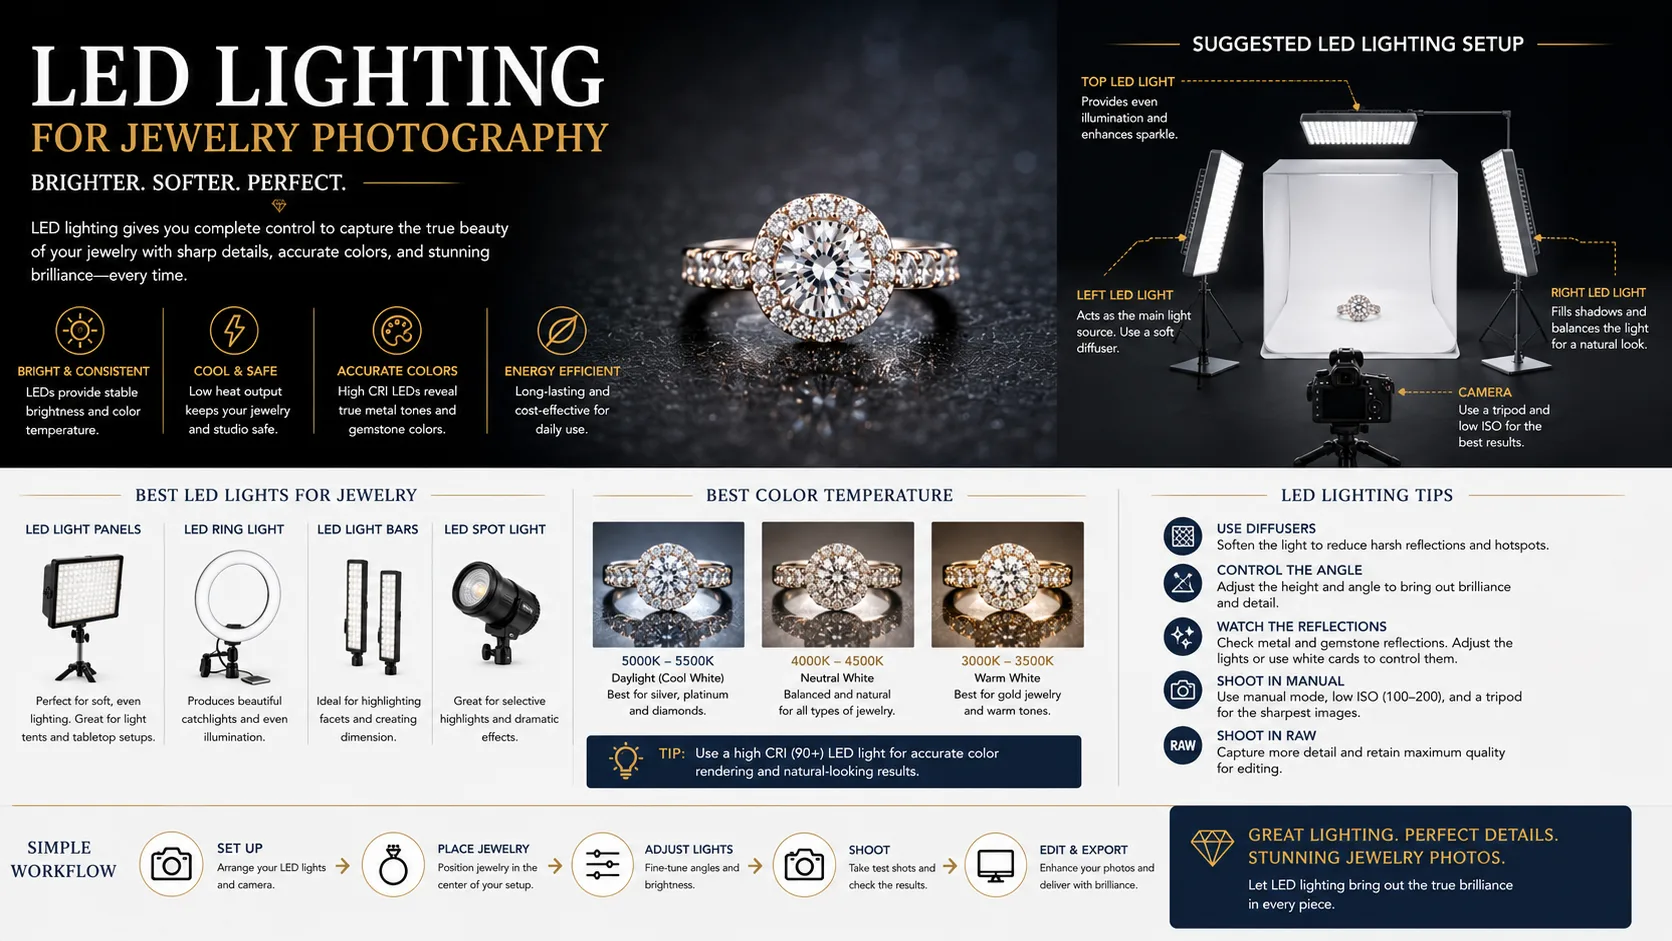
Positioning Your Lights
Light placement significantly affects the appearance of jewelry.
Professional photographers often position two or three lights around the product rather than relying on a single light source.
A basic setup includes:
- One main light positioned at a 45-degree angle
- A second light on the opposite side to soften shadows
- An optional overhead light for additional sparkle
Experimenting with light placement allows you to find the ideal balance between reflections and detail.
Avoid Direct Flash
Using a camera's built-in flash is one of the most common mistakes in jewelry photography.
Direct flash often creates:
- Overexposed highlights
- Harsh reflections
- Flat lighting
- Strong shadows
- Unnatural sparkle
Instead, use continuous lighting or external flashes with softboxes or diffusers to create softer, more flattering illumination.
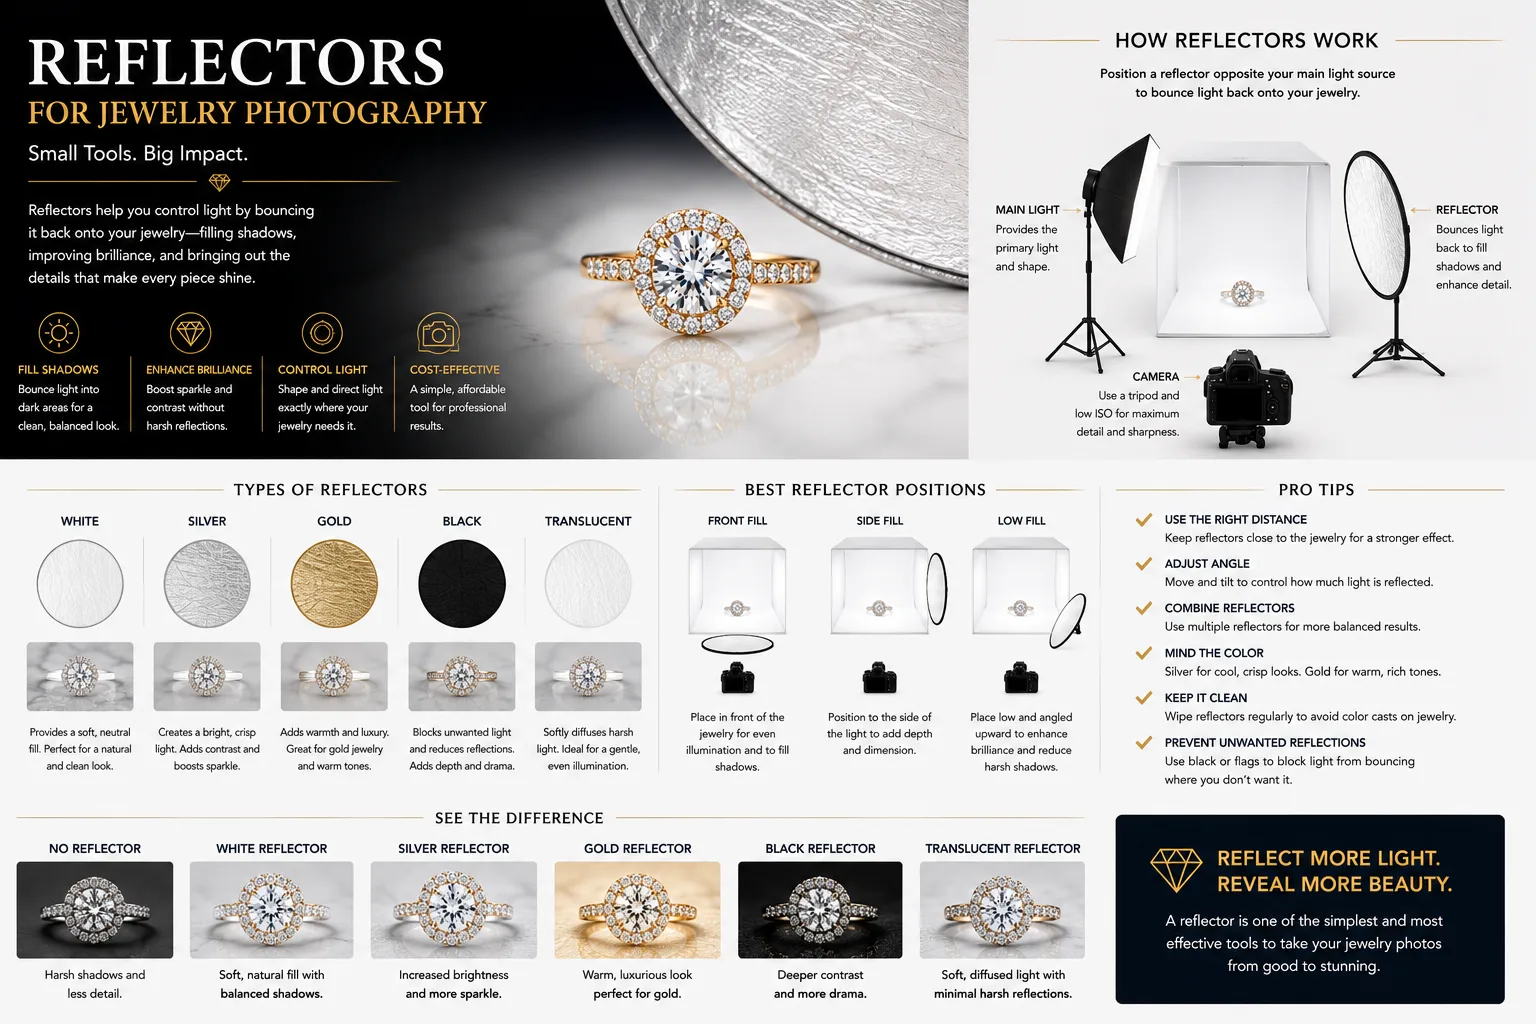
Control Reflections with Reflectors
Reflectors are simple yet powerful tools that help direct light onto the jewelry.
Common reflector materials include:
- White foam board
- Silver reflector panels
- Gold reflector panels
- White cards
White reflectors are particularly useful because they brighten shadowed areas without introducing unwanted color casts.
By adjusting the position of a reflector, you can reduce harsh shadows and reveal more detail in the jewelry.
Use a Black Card for Better Contrast
While white reflectors add light, black cards absorb it.
Professional jewelry photographers often place black foam boards near the jewelry to create subtle dark reflections that define edges and add depth to polished metals.
This technique helps rings, bracelets, and necklaces appear more three-dimensional.
Diffuse Every Light Source
One of the biggest mistakes beginners make is using bare LED lights or direct sunlight.
Undiffused light creates:
- Bright hotspots
- Strong reflections
- Distracting glare
- Uneven illumination
Always soften your lighting with a diffuser, softbox, or light tent before photographing jewelry.
The larger and softer the light source, the smoother the reflections will appear.
Choose the Right Background
Lighting and background work together to create professional product photos.
Popular jewelry backgrounds include:
- White acrylic
- Black acrylic
- Marble
- Matte gray paper
- Frosted glass
- Neutral fabric
Avoid highly reflective or brightly colored surfaces that can introduce unwanted color casts into the jewelry.
Adjust White Balance
Accurate white balance ensures your jewelry appears true to life.
Incorrect white balance can make:
- Gold appear green
- Silver look blue
- Diamonds appear yellow
- Gemstones lose their natural color
Whenever possible, set your camera's white balance manually or photograph in RAW format for greater flexibility during editing.
Keep the Lighting Consistent
Consistency is especially important if you're photographing an entire jewelry collection.
Maintain the same:
- Light placement
- Camera angle
- Background
- Camera settings
- Editing workflow
Consistent product images create a more professional online store and strengthen your brand identity.
Common Lighting Mistakes to Avoid
Many beginners struggle with jewelry photography because of a few avoidable lighting mistakes.
Avoid these common issues:
- Using direct camera flash
- Photographing under harsh sunlight
- Mixing different color temperatures
- Ignoring reflections
- Placing lights too close to the jewelry
- Using only one light source
- Forgetting to diffuse the light
- Changing the lighting setup between products
Taking the time to build a consistent lighting setup will save hours of editing and produce much better results.
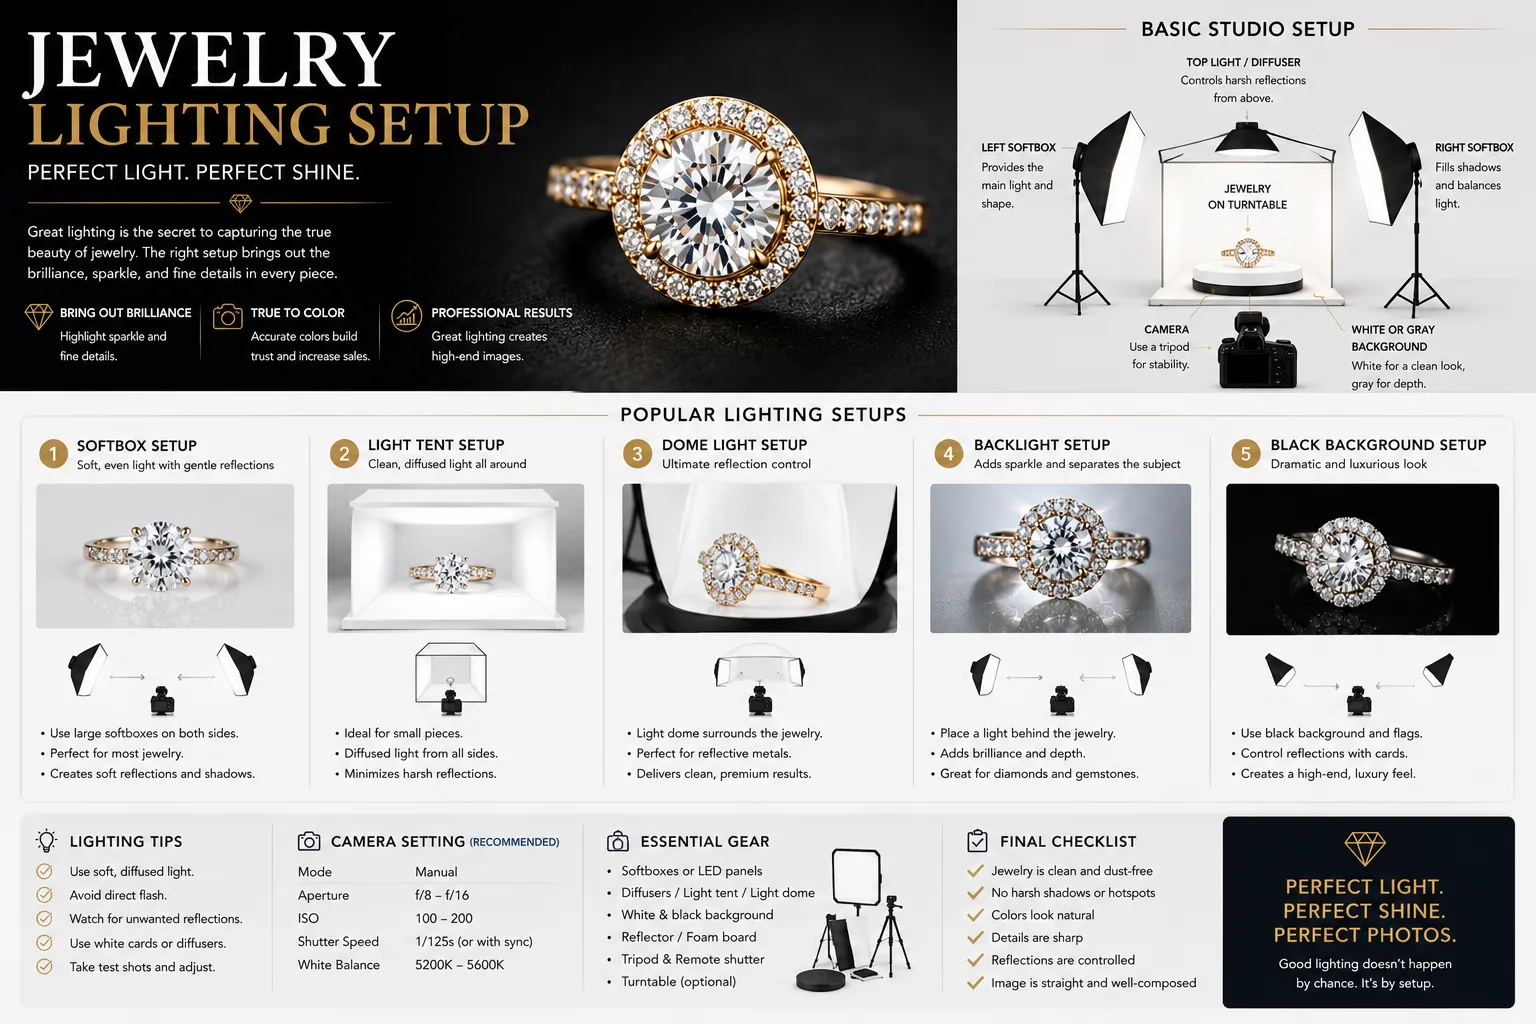
Lighting Setups for Different Types of Jewelry
Every type of jewelry reflects light differently. A lighting setup that works perfectly for a diamond ring may not produce the same results for a pearl necklace or a polished bracelet. Understanding how each type of jewelry interacts with light helps you capture cleaner, more professional product photos.
How to Light Rings
Rings are among the most photographed jewelry items for eCommerce and marketing.
Recommended Lighting Setup
- Two diffused LED lights positioned at 45° angles
- One overhead fill light
- White reflector beneath the ring
- Black cards on each side to define the metal edges
This arrangement minimizes harsh reflections while enhancing the sparkle of gemstones and preserving the shape of the band.
How to Light Necklaces
Necklaces have larger reflective surfaces and often include chains that can create unwanted highlights.
Recommended Lighting Setup
- Large softbox positioned above the jewelry
- Fill light from the front
- White reflector underneath
- Matte background to reduce glare
Carefully arrange the chain before shooting to avoid tangles and distracting reflections.
How to Light Earrings
Because earrings are relatively small, they require precise lighting and sharp focus.
Recommended Lighting Setup
- Softbox on each side
- Small overhead fill light
- Reflectors to brighten shadowed areas
If photographing a pair of earrings, ensure both pieces receive equal illumination for a balanced appearance.
How to Light Bracelets
Bracelets often feature curved, highly reflective surfaces.
Recommended Lighting Setup
- Two side lights
- Overhead soft light
- Black foam boards to shape reflections
Rotating the bracelet slightly can also help reduce glare while showcasing gemstones and intricate details.
How to Light Watches
Luxury watches combine polished metals, glass, and intricate dials, making them one of the most difficult products to photograph.
Recommended Lighting Setup
- Large diffused overhead light
- Two side lights
- Polarizing filter if available
- White and black reflectors for edge definition
Pay close attention to reflections on the watch crystal, as they can easily obscure the dial.
How to Light Gemstones
Gemstones require careful lighting to reveal their brilliance without creating blown highlights.
Recommended Lighting Setup
- Soft overhead lighting
- Small accent light positioned behind or slightly above the gemstone
- White reflectors for balanced illumination
Avoid excessive editing later by creating natural sparkle during the shoot.
Budget Home Lighting Setup
You don't need an expensive commercial studio to produce excellent jewelry photos.
A beginner-friendly setup may include:
- Two LED panel lights
- Small light tent
- Smartphone tripod
- White foam boards
- Black foam boards
- Remote shutter
- Neutral white background
This affordable setup can produce professional-looking results suitable for online stores and social media.
Professional Studio Lighting Equipment
For businesses photographing jewelry regularly, upgrading to professional equipment can improve efficiency and consistency.
Recommended equipment includes:
- High-CRI LED continuous lights
- Large softboxes
- Strip softboxes
- Photography table
- Light tent
- Macro lens
- Sturdy tripod
- Color calibration card
- Polarizing filters
- Professional camera with RAW support
While these tools require a larger investment, they provide superior image quality and greater creative control.
Advanced Jewelry Lighting Techniques
Cross-Polarization
Cross-polarization uses polarizing filters on both the light source and camera lens to dramatically reduce reflections.
Benefits include:
- Cleaner metal surfaces
- Better gemstone visibility
- Improved color accuracy
- Reduced glare
This technique is widely used in luxury jewelry photography.
Focus Stacking
Because jewelry is photographed at close distances, achieving sharp focus across the entire piece can be difficult.
Focus stacking combines multiple images focused at different distances into one perfectly sharp photograph.
This technique is especially useful for:
- Rings
- Gemstones
- Watches
- Macro jewelry photography
Edge Lighting
Adding subtle light along the edges of jewelry helps define shape and create separation from the background.
Professional photographers often use black flags and carefully positioned reflectors to control these highlights.
Pre-Shoot Lighting Checklist
Before every jewelry photography session, verify the following:
- Jewelry has been cleaned
- Lights are properly diffused
- Camera is mounted on a tripod
- White balance is correct
- Background is clean
- Reflectors are positioned correctly
- Reflections are controlled
- Camera settings are consistent
- Test photos have been reviewed
A few minutes spent checking your setup can save hours of editing later.
Final Thoughts
Lighting is the foundation of professional jewelry photography. No amount of editing can fully compensate for poor lighting, reflections, or inaccurate colors captured during the shoot.
By using soft, diffused light, controlling reflections with reflectors and black cards, and maintaining a consistent lighting setup, you can create stunning jewelry images that accurately showcase every detail. Whether you're photographing products for an online store, social media, or a luxury catalog, investing time in proper lighting techniques will improve image quality, strengthen your brand, and help your jewelry stand out in a competitive marketplace.
With practice and the right equipment, even a simple home studio can produce results that rival professional commercial photography.